Table of Contents
Blog.Fastssh.com – How to Create A .ehi Configuration File for HTTP Injector – HTTP Injector is a mobile proxy server with the ability to modify requests and access blocked websites behind a firewall with SSH support. Developed by Evozi for the Android operating system.
It works as an universal SSH/Proxy/SSL Tunnel/Shadowsocks client to help you access blocked websites behind firewall. Besides that it also encrypts your connection so that you can surf the internet privately and securely. It Secures your Android device from hackers and online threats when using a public WiFi.
Before we start the tutorial we will discuss first a brief introduction about .EHI File.
What is an .ehi file?
The EHI file is a created configuration which will be imported into the HTTP Injector. It consists of the payload, remote proxy, and SSH account credentials.
How to Create A .ehi Configuration File for HTTP Injector
Things Needed:
- HTTP Injector (You can download on playstore).
- Payload (use my payload later below).
- SSH or SSL account.
- Remote proxy (if needed).
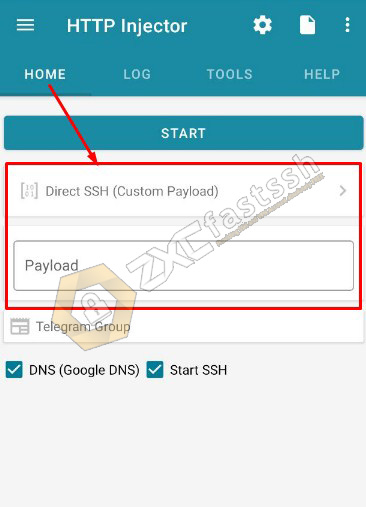
1. Create a HTTP Injector .ehi config file of type “Direct” and “Custom Payload“.
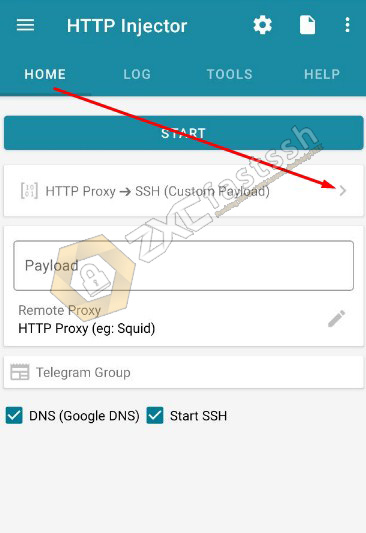
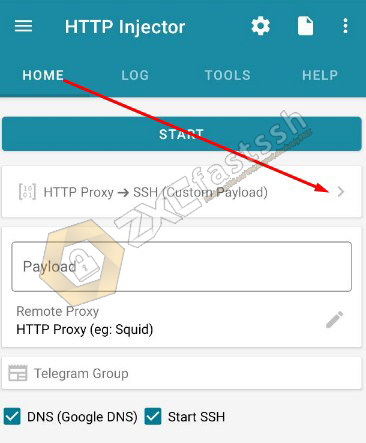
Open your HTTP Injector application then tap on “HTTP Proxy – SSH (Custom Payload)“.
On the Tunnel Type menu select “Secure Shell (SSH)” on Connect From select “None (Direct)” In the Options Check “Custom Payload” and Save.
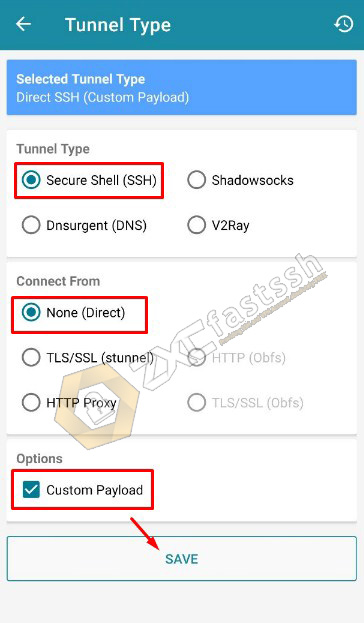
The result will be like the image below:
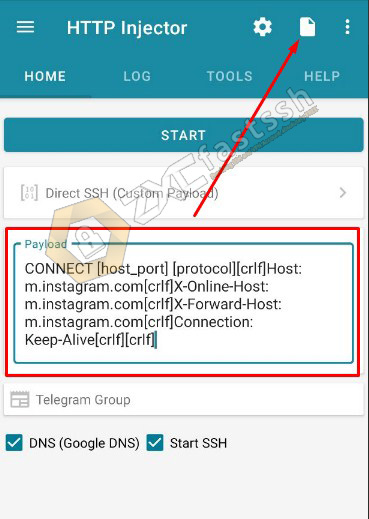
Next we will fill in the Payload on the HTTP Injector form.
The following is the active payload for Instagram bugs that you can use.
CONNECT [host_port] [protocol][crlf]Host: m.instagram.com[crlf]X-Online-Host: m.instagram.com[crlf]X-Forward-Host: m.instagram.com[crlf]Connection: Keep-Alive[crlf][crlf]
Or another payload (Brazil country):
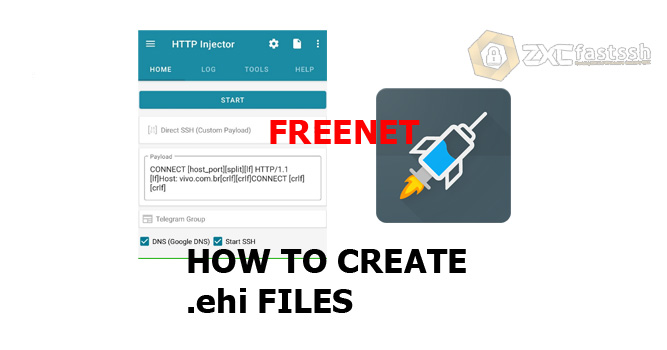
CONNECT [host_port][split][lf] HTTP/1.1 [lf]Host: vivo.com.br[crlf][crlf]CONNECT [crlf][crlf]
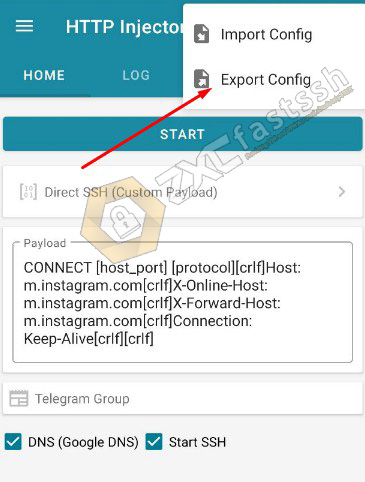
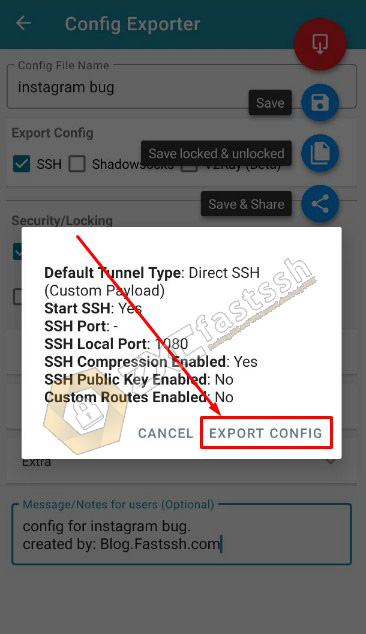
Enter the payload above on the HTTP Injector form. After that tap (follow the arrows) to export config.
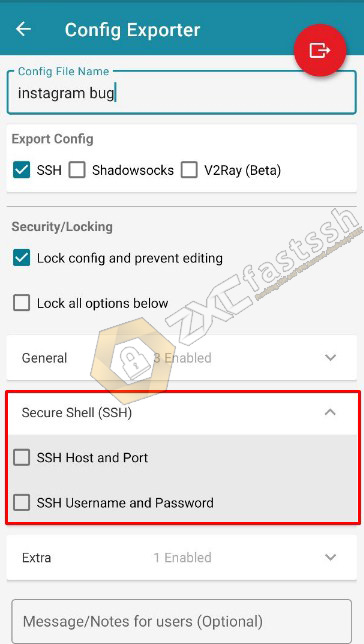
Tap Export Config.
Give your config a name, for example I made the config name “instagram bug“. In Security / Locking, check “Lock config and prevent editing” and on the General menu check “Payload” check “Remote Proxy Username and Password” and check Server Name Indication (SNI). As in the image below:
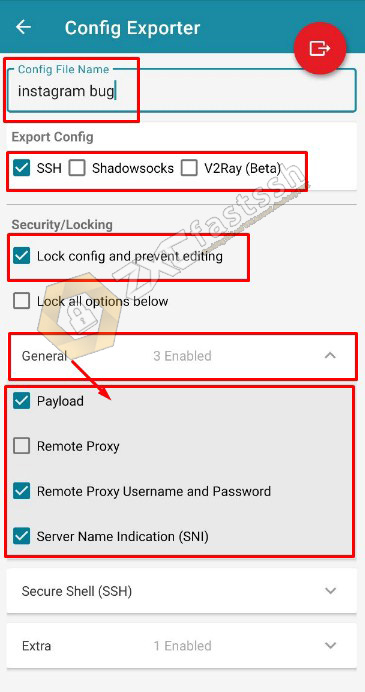
In the Secure Shell (SSH) menu you don’t need to check it, we will create a config that unlocks SSH, so that later we will enter SSH manually.
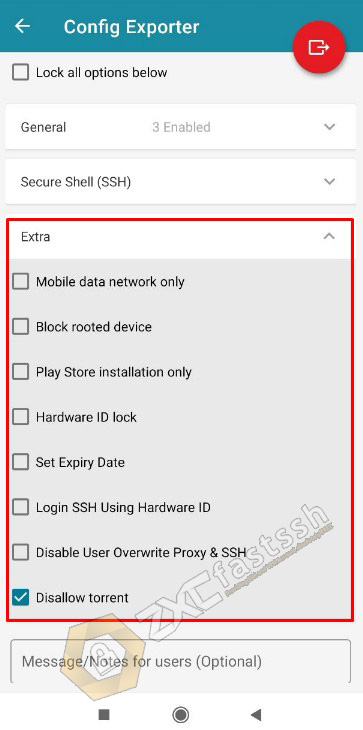
Next, on the “Extra” menu, you can check the checkbox according to your needs, for example I checked “Disallow torrent” so that the configuration cannot be used for torrent sites.
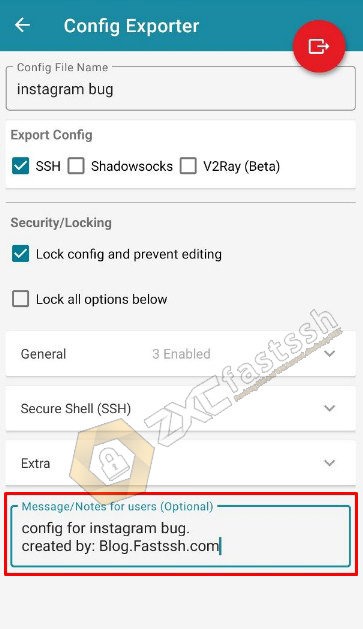
Message / Notes For Users you can fill in as you wish. Example of contact info for hi config maker.
After you set everything up correctly, now you save your config.
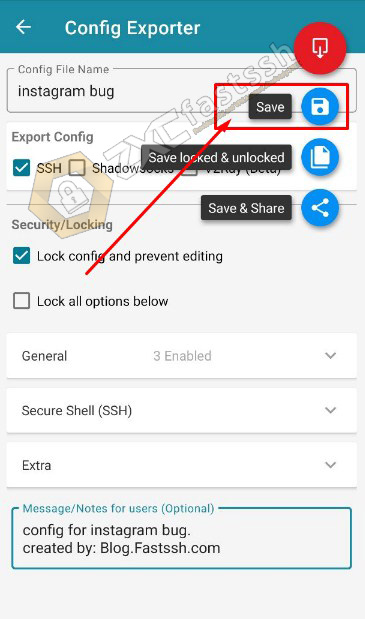
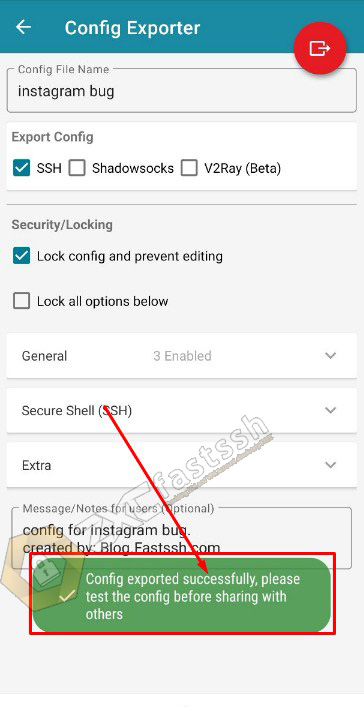
Tap EXPORT CONFIG.
Your made HTTP Injector config has been successfully exported.
You have successfully created the HTTP Injector config. The next step is to import the config that you created.
How to Import HTTP Injector Config
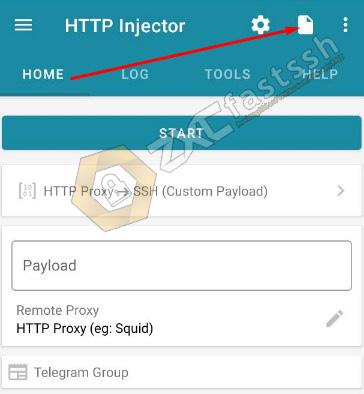
On the home menu in the HTTP Injector application, tap as shown below:
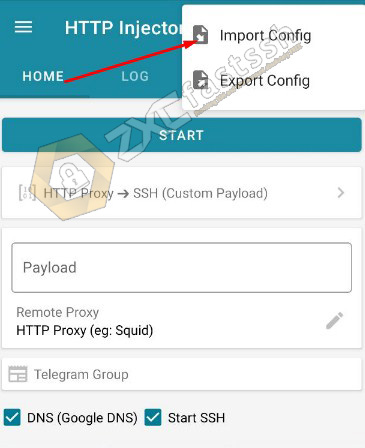
Tap Import Config.
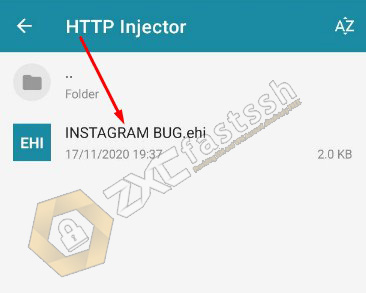
Find where you imported the config that you created earlier, usually the config file will be located in the “HTTP Injector” folder.
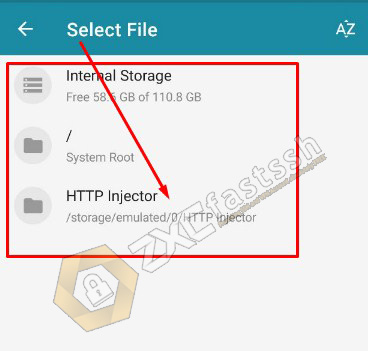
The .ehi file has been found, tap the config file.
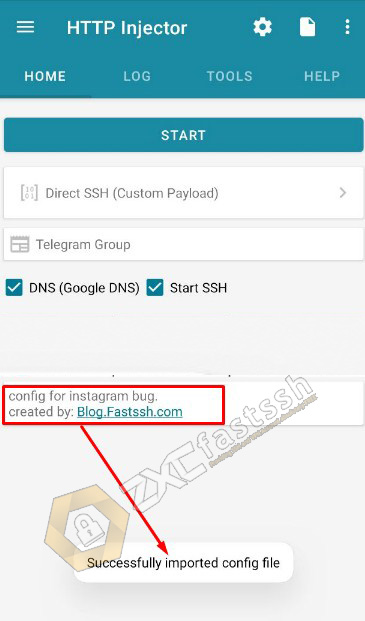
HTTP Injector config has been successfully imported correctly.
Now we go to the next tutorial, which is setting up SSH / SSL accounts on HTTP Injector.
Settings SSH / SSL in HTTP Injector
To set up SSH / SSL on HTTP Injector, of course you must have an SSH / SSL account first, to create an SSH / SSL account for free you can follow the tutorial we have shared in the link below:
Note! Remember to create an SSH / SSL account according to the config you will use, if you use the payload type config you usually use SSH Dropbear or SSH Open SSH. Meanwhile, if you use the SSL (SNI) type config then you are using SSH SSL / STUNNEL. For example, we use SSH Dropbear because the config we are using is No Proxy (Direct Payload) config.
Tap on the (gear icon) in the upper right corner of the http injector application.
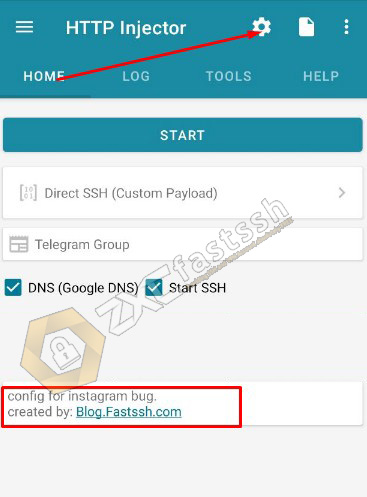
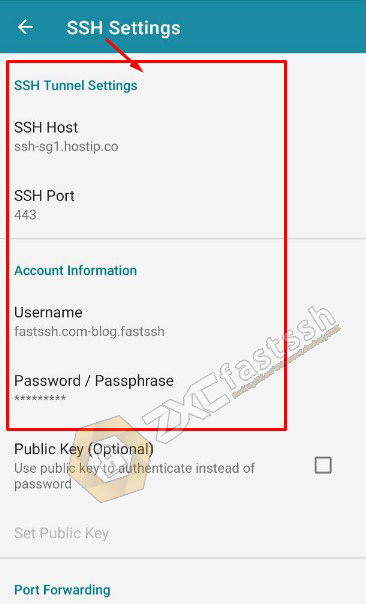
On the settings menu tap the Secure Shell (SSH) menu.

Enter the host, username, password and port of the ssh account that you created on fastssh.
Settings SSH / SSL in HTTP Injector is done.
Connect HTTP Injector
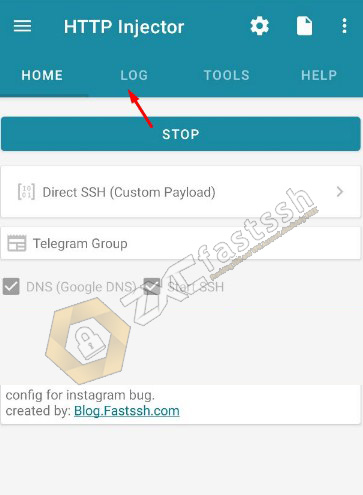
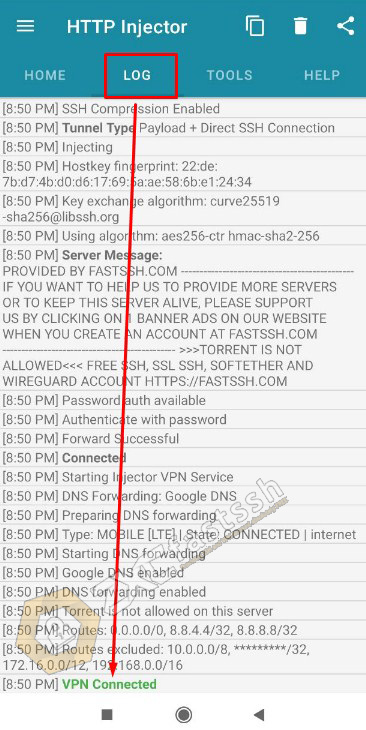
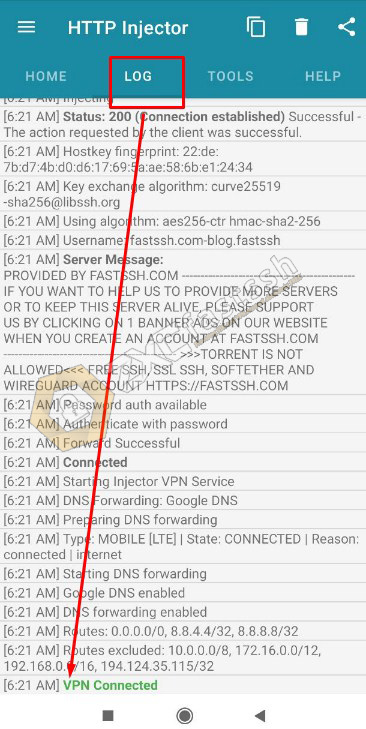
After import config, enter SSH account, now you connect your HTTP Injector. By tap START. After that, tap on the “LOG” menu to see the status info, whether your HTTP Injector has been successfully connected?
Congratulations! Your HTTP Injector has been successfully connected. That means you have successfully created .ehi HTTP Injector Config.
Done.
The tutorial we described above is to create a .ehi HTTP Injector config of No Proxy, Direct, Payload types. You can also create a .ehi “Custom Payload” and “Proxy”.
Below we will explain about creating a .ehi type “Custom Payload” and “Proxy“.
2. Create a HTTP Injector .ehi config file of type “Custom Payload” and “Proxy”
To make .ehi HTTP Injector config with Payload and Proxy types you need an active Squid Proxy. The method is almost the same as creating a Direct type .ehi config as in the tutorial above, it’s just that we need an additional proxy.
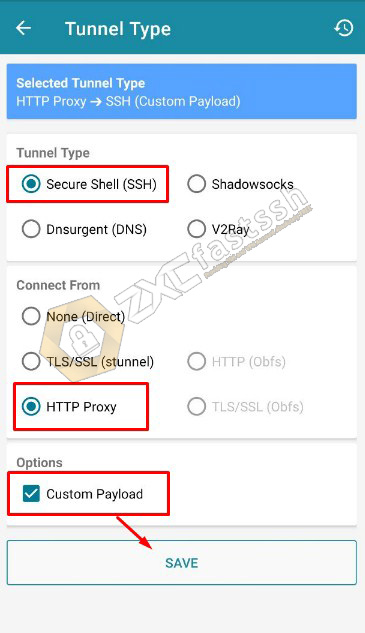
Open your HTTP Injector application then tap on “HTTP Proxy – SSH (Custom Payload)“.
On the “Tunnel Type” menu, check “Secure Shell (SSH)” On the “Connect From” menu select “HTTP Proxy” and check “Custom Payload” then save. Like the picture below.
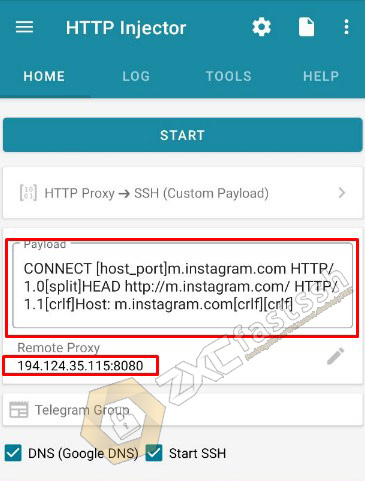
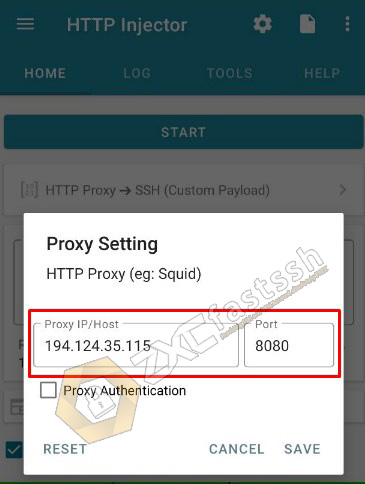
In From “Payload” fill in the payload then “Remote Proxy” fill with Squid Proxy and its Port.
An example of a payload that you can use for this type of Squid proxy:
CONNECT [host_port]m.instagram.com HTTP/1.0[split]HEAD http://m.instagram.com/ HTTP/1.1[crlf]Host: m.instagram.com[crlf][crlf]
Then we use the Squid Proxy and the Port we use the Squid Proxy from FastSSH because we also use SSH from FastSSH:
- 194.124.35.115:8080 (SquidProxy:Port).
After that you enter the SSH account. For how to create an SSH account and how to set SSH on the HTTP Injector as described above, the method is the same.
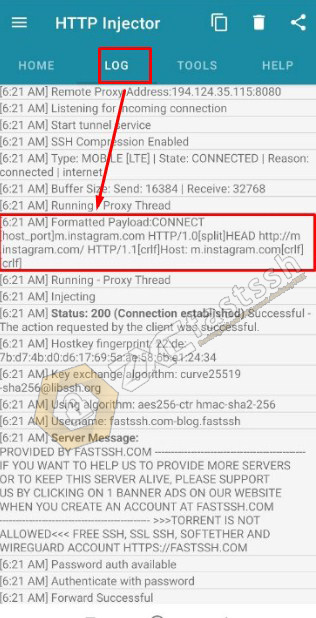
Until this point, you just need to connect your HTTP Injector to test whether the Payload and Proxy Squid work?
Tap START then tap LOG To see the status.
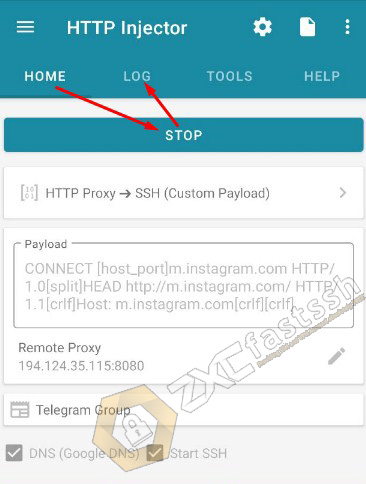
Payload and Proxy Squid successfully connect properly.
You have successfully created a .ehi HTTP Injector config type Payload + Proxy Squid. Now you can export your config to share with other users.
3. Create a HTTP Injector .ehi config file of type SSL or SNI
To create a .ehi HTTP Injector type SSL config or it can be called using SNI, you don’t need a Payload or Proxy. All you need is an active SNI / host bug.
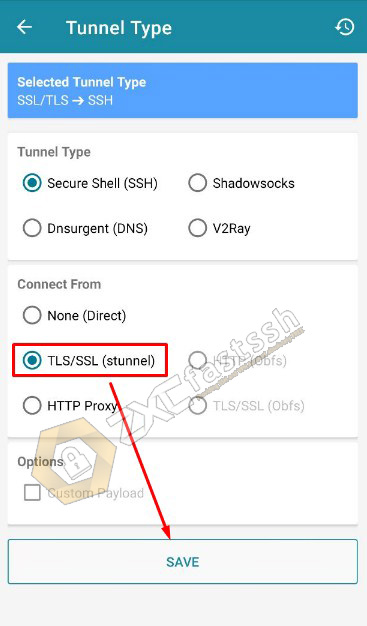
Open your HTTP Injector application then tap on “HTTP Proxy – SSH (Custom Payload)“.
Check TLS / SSL (stunnel) then save.
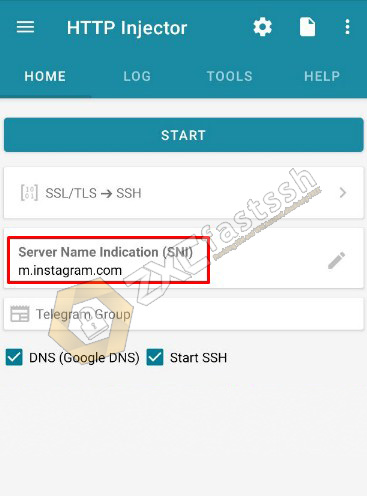
The form “Server Name Indication (SNI) you fill in with an active SNI host bug in accordance with the free internet trick you will use. For example, I use SNI “m.instagram.com” to change the Instagram package to become a regular quota.
After that you export the config that you have created. The way to import the config is exactly the same as the tutorial that we explained above.
Then for the SSH you use, you have to create an SSH type SSL / STUNNEL account. The tutorial on how to set SSH is also the same as the tutorial above, the only difference lies in the type of SSH you are using.
- Create an SSH SSL / SSL (Stunnel) Account.
- How to create an SSH SSL / SSL (Stunnel) account.
- How to Input SSL (Stunnel) Account to HTTP Injector.
Explanation of Payload for HTTP Injector
Here are the payload basics that you can develop yourself according to your needs.
As we have explained above, payload functions so that your free internet tricks work properly, payload has many types. Here are the payload basics that you can develop yourself.
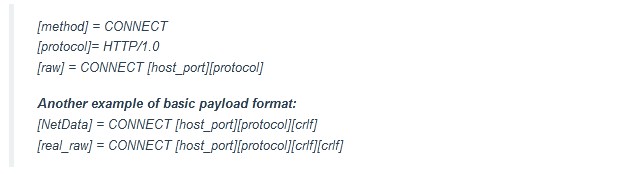
Payload after concatenation:
- Normal: CONNECT [host_port] [protocol][crlf]Host: domain.com[crlf][crlf]
- Front Inject: GET http://domain.com/ HTTP/1.1[crlf]Host: domain.com[crlf][crlf]CONNECT [host_port] [protocol][crlf][crlf]
- Back Inject: CONNECT [host_port] HTTP/1.1[crlf][crlf]GET http://domain.com/ [protocol][crlf]Host: domain.com[crlf][crlf]
- Front Query: CONNECT domain.com@[host_port][crlf]GET http://domain.com/ [protocol][crlf]Host: domain.com[crlf][crlf]
- Back Query: CONNECT [host_port]@domain.com[crlf]GET http://domain.com/ [protocol][crlf]Host: domain.com[crlf][crlf]
“domain.com” please change it yourself with an active bug host / sni in accordance with the free internet trick that you will use.
The rest about Payload and Bug Host / SNI you can find and develop yourself according to your needs.
Conclusion
By following the tutorial “How to Create A .ehi Configuration File for HTTP Injector” we shared, you can easily create any type of HTTP Injector .ehi config according to the menu on the HTTP Injector. You can also develop your own, such as developing payload types, active SNI host bugs, so that the free internet tricks you use run well.